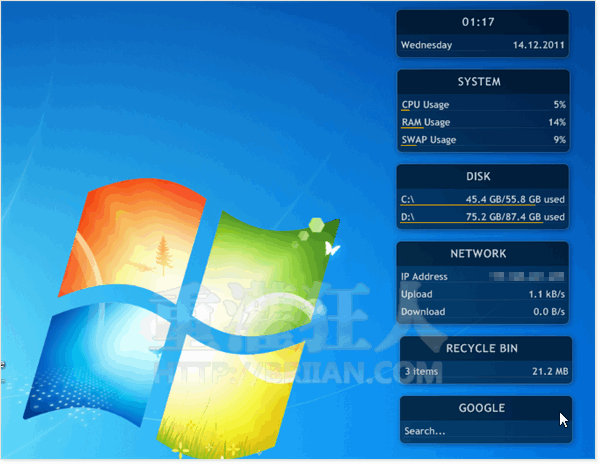
Rainmeter v3.1 在桌面顯示 CPU、記憶體、硬碟、網路使用狀況


2016/12/25 更新:軟體版本更新至 v3.1 最新版。
一般人應該都會在電腦桌面上放置很多檔案、圖示或資料夾,方便我們隨時按兩下、開來看。如果你的桌面很大、很空,而且平常一直很關心電腦的硬體、系統的運作狀況的話,可以安裝下面這個免費的小程式 Rainmeter。
Rainmeter 可以在桌面上顯示包括 CPU、記憶體、硬碟機、網路卡…等等裝置的使用狀況,讓我們隨時掌握目前是否有不正常的系統負載、記憶體不足或網路流量異常...等等問題,也可顯示如時間日期、電腦對外的 IP 位址..等等資訊,還有個簡易型的資源回收桶讓我們直接按右鍵、清空垃圾。
如果你常常會需要用到 Google 搜尋引擎的話,最下面還有個快速搜尋框,按一下就可以快速查找你要的資訊,算是個滿方便的小工具。
▇ 軟體小檔案 ▇ (錯誤、版本更新回報)
- 軟體名稱:Rainmeter
- 軟體版本:3.1
- 軟體語言:繁體中文、英文,內建多國語系
- 軟體性質:免費軟體(GNU GPL v2)
- 檔案大小:1.31 MB
- 系統支援:Windows XP/Vista/Win7/Win 8/Win 10
- 官方網站:http://code.google.com/p/rainmeter/
- 軟體下載:按這裡
使用方法:
第1步 安裝好 rainmeter 程式、啟動之後,桌面上就會出現如下圖的桌面小工具,每個方框都可以任意移動位置、設定為顯示或隱藏。
第2步 另外也可自行編輯面板、切換佈景主題或調整位置、透明度...等各種設定。

修改之後顯示不出來,可以幫我看看是哪裡錯嗎
; Lines starting ; (semicolons) are commented out.
; That is, they do not affect the code and are here for demonstration purposes only.
; ———————————-
; HOWTO: Adding more disks
; ———————————-
; Adding more disks is a pretty straightforward process. Follow the following steps to turn
; this 2 disks skin into a 3 disks skin. You can then extend it even further as you wish.
;
; 1) Create a new variable called disk3=X: directly below disk2=D: in the [Variables] section
; 2) Create a copy of the [measureTotalDisk2] and [measureUsedDisk2] sections
; 3) Rename the copied sections to [measureTotalDisk3] and [measureUsedDisk3], respectively.
; Also change Drive=#disk2# to Drive=#disk3#
; 4) Create a copy of the [meterLabelDisk2], [meterValueDisk2], and [meterBarDisk2].
; Rename all Disk2’s in the copied sections to Disk3.
; 5) Now we need to change the Y= values to adjust height. Change Y= under [meterLabelDisk3]
; to Y=80 (calculated by adding 20 to the Y= value of previous meterLabel).
; Then change Y= under [meterBarDisk3] to Y=92 (calculated by adding 20 to the Y= value of previous meterBar).
; 6) Save the file as ‘3 Disks.ini’. Now right-click on the Rainmeter tray icon and select
; ‘Refresh All’. Now go activate the ‘3 Disks.ini’ skin and enjoy! :)
[Rainmeter]
; This section contains general settings that can be used to change how Rainmeter behaves.
Update=1000
Background=#@#Background.png
; #@# is equal to Rainmeter\Skins\illustro\@Resources
BackgroundMode=3
BackgroundMargins=0,34,0,14
[Metadata]
; Contains basic information of the skin.
Name=Disk
Author=poiru
Information=Displays disk usage.
License=Creative Commons BY-NC-SA 3.0
Version=1.0.0
[Variables]
; Variables declared here can be used later on between two # characters (e.g. #MyVariable#).
fontName=Trebuchet MS
textSize=8
colorBar=235,170,0,255
colorText=255,255,255,205
disk1=C:
disk2=D:
disk2=E:
; ———————————-
; MEASURES return some kind of value
; ———————————-
[measureTotalDisk1]
; This measure returns the total disk space
Measure=FreeDiskSpace
Drive=#disk1#
Total=1
UpdateDivider=120
[measureUsedDisk1]
; Returns inverted value of free disk space (i.e. used disk space)
Measure=FreeDiskSpace
Drive=#disk1#
InvertMeasure=1
UpdateDivider=120
[measureTotalDisk2]
Measure=FreeDiskSpace
Drive=#disk2#
Total=1
UpdateDivider=120
[measureUsedDisk2]
Measure=FreeDiskSpace
Drive=#disk2#
InvertMeasure=1
UpdateDivider=120
[measureTotalDisk3]
Measure=FreeDiskSpace
Drive=#disk3#
Total=1
UpdateDivider=120
[measureUsedDisk3]
Measure=FreeDiskSpace
Drive=#disk3#
InvertMeasure=1
UpdateDivider=120
; ———————————-
; STYLES are used to “centralize” options
; ———————————-
[styleTitle]
StringAlign=Center
StringCase=Upper
StringStyle=Bold
StringEffect=Shadow
FontEffectColor=0,0,0,50
FontColor=#colorText#
FontFace=#fontName#
FontSize=10
AntiAlias=1
ClipString=1
[styleLeftText]
StringAlign=Left
; Meters using styleLeftText will be left-aligned.
StringCase=None
StringStyle=Bold
StringEffect=Shadow
FontEffectColor=0,0,0,20
FontColor=#colorText#
FontFace=#fontName#
FontSize=#textSize#
AntiAlias=1
ClipString=1
[styleRightText]
StringAlign=Right
StringCase=None
StringStyle=Bold
StringEffect=Shadow
FontEffectColor=0,0,0,20
FontColor=#colorText#
FontFace=#fontName#
FontSize=#textSize#
AntiAlias=1
ClipString=1
[styleBar]
BarColor=#colorBar#
BarOrientation=HORIZONTAL
SolidColor=255,255,255,15
; ———————————-
; METERS display images, text, bars, etc.
; ———————————-
[meterTitle]
Meter=String
MeterStyle=styleTitle
; Using MeterStyle=styleTitle will basically “copy” the
; contents of the [styleTitle] section here during runtime.
X=100
Y=12
W=190
H=18
Text=Disks
; Even though the text is set to Disks, Rainmeter will display
; it as DISKS, because styleTitle contains StringCase=Upper.
[meterLabelDisk1]
Meter=String
MeterStyle=styleLeftText
X=10
Y=40
W=190
H=14
Text=#disk1#\
[meterValueDisk1]
Meter=String
MeterStyle=styleRightText
MeasureName=measureUsedDisk1
MeasureName2=measureTotalDisk1
X=200
Y=0r
; r stands for relative. In this case, the Y postition of meterValueCPU is 0 pixels
; below the Y value of the previous meter (i.e it’s the same as in meterLabelCPU).
W=190
H=14
Text=%1B/%2B used
; %1 stands for the value of MeasureName (measureUsedDisk1 in this case).
; %2 stands for the value of MeasureName2.
NumOfDecimals=1
AutoScale=1
; Because disk measures return the free/used space in bytes, we must use AutoScale=1 to
; automatically scale the value into a more readable figure.
LeftMouseUpAction=[“#disk1#\”]
; Open #disk1# on click
[meterBarDisk1]
Meter=Bar
MeterStyle=styleBar
MeasureName=measureUsedDisk1
X=10
Y=52
W=190
H=1
[meterLabelDisk2]
Meter=String
MeterStyle=styleLeftText
X=10
Y=60
W=190
H=14
Text=#disk2#\
LeftMouseUpAction=[“#disk2#\”]
[meterValueDisk2]
Meter=String
MeterStyle=styleRightText
MeasureName=measureUsedDisk2
MeasureName2=measureTotalDisk2
X=200
Y=0r
W=190
H=14
Text=%1B/%2B used
NumOfDecimals=1
AutoScale=1
[meterBarDisk2]
Meter=Bar
MeterStyle=styleBar
MeasureName=measureUsedDisk2
X=10
Y=72
W=190
H=1
[meterLabelDisk3]
Meter=STRING
MeterStyle=styleLeftText
X=10
Y=80
W=190
H=14
Text=”#disk3#\”
LeftMouseUpAction=!Execute [“#disk3#\”]
[meterValueDisk3]
Meter=STRING
MeterStyle=styleRightText
MeasureName=measureUsedDisk3
MeasureName2=measureTotalDisk3
X=200
Y=0r
W=190
H=14
Text=”%1B/%2B used”
NumOfDecimals=1
AutoScale=1
[meterBarDisk3]
Meter=BAR
MeterStyle=styleBar
MeasureName=measureUsedDisk3
X=10
Y=92
W=190
H=1
這個軟體的網路速度是不是不準阿
會跑出很驚人的數字
速度是正常的2倍
硬碟順序應該是剛開始往下拉,不遠的地方有個 [Variables]
disk1=C:
disk2=D:
disk3=E:
disk4=F:
disk5=G:
修改成自己硬碟的順序,應該是這樣吧。
[Variables]
; Variables declared here can be used later on between two # characters (e.g. #MyVariable#).
fontName=Trebuchet MS
textSize=8
colorBar=235,170,0,255
colorText=255,255,255,205
disk1=C:
disk2=D:
disk3=H:
這是我的順序~但是顯示出來的順序是
C:
H:
D:
^^ 不知如何修改
哈~~其實答案就在問題中耶!!
既然
[Variables]
disk1=C:
disk2=D:
disk3=H:
顯示結果是
C:
H:
D:
那就直接修改為
[Variables]
disk1=C:
disk2=H:
disk3=D:
面板顯示出來的順序就是
C:
D:
H:
哈哈~~腦筋終於轉過來了!!
終於是漂亮有規則的了!!
為什麼…就是獨缺顯卡呢@”@
我稍微改了一下五個硬碟
可是會出錯
誰可以幫忙修正一下
; Lines starting ; (semicolons) are commented out.
; That is, they do not affect the code and are here for demonstration purposes only.
; ———————————-
; HOWTO: Adding more disks
; ———————————-
; Adding more disks is a pretty straightforward process. Follow the following steps to turn
; this 2 disks skin into a 3 disks skin. You can then extend it even further as you wish.
;
; 1) Create a new variable called disk3=X: directly below disk2=D: in the [Variables] section
; 2) Create a copy of the [measureTotalDisk2] and [measureUsedDisk2] sections
; 3) Rename the copied sections to [measureTotalDisk3] and [measureUsedDisk3], respectively.
; Also change Drive=#disk2# to Drive=#disk3#
; 4) Now find the [meterBackground] section and change 2Line.png to 3Line.png in ImageName
; 5) Create a copy of the [meterLabelDisk2], [meterValueDisk2], and [meterBarDisk2].
; Rename all Disk2’s in the copied sections to Disk3.
; 6) Now we need to change the Y= values to adjust height. Change Y= under [meterLabelDisk2]
; to Y=80 (calculated by adding 20 to the Y= value of previous meterLabel).
; Then change Y= under [meterBarDisk3] to Y=92 (calculated by adding 20 to the Y= value of previous meterBar).
; 7) Save the file as ‘3 Disks.ini’. Now right-click on the Rainmeter tray icon and select
; ‘Refresh All’. Now go activate the ‘3 Disks.ini’ skin and enjoy! :)
[Rainmeter]
; This section contains general settings that can be used to change how Rainmeter behaves.
Author=poiru
AppVersion=2000000
Update=1000
[Metadata]
; Contains basic information of the skin.
Description=Displays disk usage.
License=Creative Commons BY-NC-SA 3.0
Version=1.0.0
[Variables]
; Variables declared here can be used later on between two # characters (e.g. #MyVariable#).
fontName=Trebuchet MS
textSize=8
colorBar=235,170,0,255
colorText=255,255,255,205
disk1=C:
disk2=D:
disk3=E:
disk4=F:
disk5=G:
; ———————————-
; MEASURES return some kind of value
; ———————————-
[measureTotalDisk1]
; This measure returns the total disk space
Measure=FreeDiskSpace
Drive=#disk1#
Total=1
UpdateDivider=120
[measureUsedDisk1]
; Returns inverted value of free disk space (i.e. used disk space)
Measure=FreeDiskSpace
Drive=#disk1#
InvertMeasure=1
UpdateDivider=120
[measureTotalDisk2]
Measure=FreeDiskSpace
Drive=#disk2#
Total=1
UpdateDivider=120
[measureUsedDisk2]
Measure=FreeDiskSpace
Drive=#disk2#
InvertMeasure=1
UpdateDivider=120
[measureTotalDisk3]
Measure=FreeDiskSpace
Drive=#disk3#
Total=1
UpdateDivider=120
[measureUsedDisk3]
Measure=FreeDiskSpace
Drive=#disk3#
InvertMeasure=1
UpdateDivider=120
[measureTotalDisk4]
Measure=FreeDiskSpace
Drive=#disk4#
Total=1
UpdateDivider=120
[measureUsedDisk4]
Measure=FreeDiskSpace
Drive=#disk4#
InvertMeasure=1
UpdateDivider=120
[measureTotalDisk2]
Measure=FreeDiskSpace
Drive=#disk5#
Total=1
UpdateDivider=120
[measureUsedDisk2]
Measure=FreeDiskSpace
Drive=#disk5#
InvertMeasure=1
UpdateDivider=120
; ———————————-
; STYLES are used to “centralize” options
; ———————————-
[styleTitle]
StringAlign=CENTER
StringCase=UPPER
StringStyle=BOLD
StringEffect=SHADOW
FontEffectColor=0,0,0,50
FontColor=#colorText#
FontFace=#fontName#
FontSize=10
AntiAlias=1
ClipString=1
[styleLeftText]
StringAlign=LEFT
; Meters using styleLeftText will be left-aligned.
StringCase=NONE
StringStyle=BOLD
StringEffect=SHADOW
FontEffectColor=0,0,0,20
FontColor=#colorText#
FontFace=#fontName#
FontSize=#textSize#
AntiAlias=1
ClipString=1
[styleRightText]
StringAlign=RIGHT
StringCase=NONE
StringStyle=BOLD
StringEffect=SHADOW
FontEffectColor=0,0,0,20
FontColor=#colorText#
FontFace=#fontName#
FontSize=#textSize#
AntiAlias=1
ClipString=1
[styleBar]
BarColor=#colorBar#
BarOrientation=HORIZONTAL
SolidColor=255,255,255,15
; ———————————-
; METERS display images, text, bars, etc.
; ———————————-
[meterBackground]
Meter=IMAGE
ImageName=#SKINSPATH#\illustro\SHARED\Background5Line.png
; #SKINSPATH# is a global variable that stands for your skin path. It is
; usually Documents\Rainmeter\Skins.
X=0
Y=0
[meterTitle]
Meter=STRING
MeterStyle=styleTitle
; Using MeterStyle=styleTitle will basically “copy” the
; contents of the [styleTitle] section here during runtime.
X=100
Y=12
W=190
H=18
Text=”Disk”
; Even though the text is set to Disk, Rainmeter will display
; it as DISK, because styleTitle contains StringCase=UPPER.
[meterLabelDisk1]
Meter=STRING
MeterStyle=styleLeftText
X=10
Y=40
W=190
H=14
Text=”#disk1#\”
[meterValueDisk1]
Meter=STRING
MeterStyle=styleRightText
MeasureName=measureUsedDisk1
MeasureName2=measureTotalDisk1
X=200
Y=0r
; r stands for relative. In this case, the Y postition of meterValueCPU is 0 pixels
; below the Y value of the previous meter (i.e it’s the same as in meterLabelCPU).
W=190
H=14
Text=”%1B/%2B used”
; %1 stands for the value of MeasureName (measureUsedDisk1 in this case).
; %2 stands for the value of MeasureName2.
NumOfDecimals=1
AutoScale=1
; Because disk measures return the free/used space in bytes, we must use AutoScale=1 to
; automatically scale the value into a more readable figure.
LeftMouseUpAction=!Execute [“#disk1#\”]
; Open #disk1# on click
[meterBarDisk1]
Meter=BAR
MeterStyle=styleBar
MeasureName=measureUsedDisk1
X=10
Y=52
W=190
H=1
[meterLabelDisk2]
Meter=STRING
MeterStyle=styleLeftText
X=10
Y=60
W=190
H=14
Text=”#disk2#\”
LeftMouseUpAction=!Execute [“#disk2#\”]
[meterValueDisk2]
Meter=STRING
MeterStyle=styleRightText
MeasureName=measureUsedDisk2
MeasureName2=measureTotalDisk2
X=200
Y=0r
W=190
H=14
Text=”%1B/%2B used”
NumOfDecimals=1
AutoScale=1
[meterBarDisk2]
Meter=BAR
MeterStyle=styleBar
MeasureName=measureUsedDisk2
X=10
Y=72
W=190
H=1
[meterLabelDisk3]
Meter=STRING
MeterStyle=styleLeftText
X=10
Y=80
W=190
H=14
Text=”#disk3#\”
LeftMouseUpAction=!Execute [“#disk3#\”]
[meterValueDisk3]
Meter=STRING
MeterStyle=styleRightText
MeasureName=measureUsedDisk3
MeasureName3=measureTotalDisk3
X=200
Y=0r
W=190
H=14
Text=”%1B/%2B used”
NumOfDecimals=1
AutoScale=1
[meterBarDisk3]
Meter=BAR
MeterStyle=styleBar
MeasureName=measureUsedDisk3
X=10
Y=72
W=190
H=1
[meterLabelDisk4]
Meter=STRING
MeterStyle=styleLeftText
X=10
Y=100
W=190
H=14
Text=”#disk4#\”
LeftMouseUpAction=!Execute [“#disk4#\”]
[meterValueDisk4]
Meter=STRING
MeterStyle=styleRightText
MeasureName=measureUsedDisk4
MeasureName4=measureTotalDisk4
X=200
Y=0r
W=190
H=14
Text=”%1B/%2B used”
NumOfDecimals=1
AutoScale=1
[meterBarDisk4]
Meter=BAR
MeterStyle=styleBar
MeasureName=measureUsedDisk4
X=10
Y=72
W=190
H=1
[meterLabelDisk5]
Meter=STRING
MeterStyle=styleLeftText
X=10
Y=120
W=190
H=14
Text=”#disk5#\”
LeftMouseUpAction=!Execute [“#disk5#\”]
[meterValueDisk5]
Meter=STRING
MeterStyle=styleRightText
MeasureName=measureUsedDisk5
MeasureName5=measureTotalDisk5
X=200
Y=0r
W=190
H=14
Text=”%1B/%2B used”
NumOfDecimals=1
AutoScale=1
[meterBarDisk5]
Meter=BAR
MeterStyle=styleBar
MeasureName=measureUsedDisk5
X=10
Y=72
W=190
H=1
[measureTotalDisk4]
Measure=FreeDiskSpace
Drive=#disk4#
Total=1
UpdateDivider=120
[measureUsedDisk4]
Measure=FreeDiskSpace
Drive=#disk4#
InvertMeasure=1
UpdateDivider=120
底下有誤
[ [measureTotalDisk2] 請改成5 ]
[ [measureUsedDisk2] 請改成5 ]
接著是最底下 [meterBarDisk]的部份,請調整欄位高度,每增加一個硬碟,高度增加20。
[meterBarDisk1] 是52,[meterBarDisk2]是72
所以
[meterBarDisk3] 請將Y的值修正成 92
[meterBarDisk4] 請將Y的值修正成 112
[meterBarDisk5] 請將Y的值修正成 132
改成這樣儲存之後,重新開啟 Rainmeter 讀取新Skin [ 5 disks ] 應該就可以了。
連續發了兩篇一樣的回應真是抱歉呢=..=
[measureTotalDisk4]
Measure=FreeDiskSpace
Drive=#disk4#
Total=1
UpdateDivider=120
[measureUsedDisk4]
Measure=FreeDiskSpace
Drive=#disk4#
InvertMeasure=1
UpdateDivider=120
底下有誤
[ [measureTotalDisk2] 請改成5 ]
[ [measureUsedDisk2] 請改成5 ]
接著是最底下 [meterBarDisk]的部份,請調整欄位高度,每增加一個硬碟,高度增加20。
[meterBarDisk1] 是52,[meterBarDisk2]是72
所以
[meterBarDisk3] 請將Y的值修正成 92
[meterBarDisk4] 請將Y的值修正成 112
[meterBarDisk5] 請將Y的值修正成 132
改成這樣儲存之後,重新開啟 Rainmeter 讀取新Skin [ 5 disks ] 應該就可以了。
IP顯示的不是公司內網的IP呢….
謝謝你提供了非常有用軟體,讓我可以有效的監控我的電腦運作,雖然還未使用,但是可以一目了然的監控,真的可以讓我受益良多哦
凹嗚~~~~amazing~~~~~~~
電腦分割了CDE三個槽
他只出現C、D
要怎麼把E開出來?
找到了~
編輯檔裡面有步驟說明:D
硬碟已經都有顯示出來,
但是目前順序是
C:
H:
D:
請問要如何修改顯示為
C:
D:
H:
謝謝~
請問要怎麼把(D:\)改成(E:\)呢?
面板上的資訊可以透過修改 ini 設定檔的方式
使其以繁體中文顯示
例如:illustro\system\system.ini
以記事本打開之後,Ctrl + F 搜尋 [meterTitle]
底下有一行 Text=”system”
改成 Text=”系統” 儲存後關掉設定檔
下次重開 Rainmeter 就會以繁體中文顯示了
其他設定檔也能用這方式。
若安裝有問題,請先至下列網站安裝Visual C++ 2010 SP1 redistributable package
http://rainmeter.net/redist/