如何幫WordPress「所見即所得編輯器」新增其他按鈕?
之前有介紹過「開啟WordPress 2.1中的隱藏功能—TinyMCE所見即所得「進階」編輯器!」這功能,不過每次要使用WordPess來編輯文章時,卻都得再按一次〔Alt〕+〔v〕快速鍵才能切換過去(重點是Opera瀏覽器沒法正常使用),有沒有什麼方法可以讓預設的編輯器「自動啟用」進階編輯按鈕呢?
在WordPress內建的TinyMCE所見即所得編輯器裡面,內建了三條工具BAR,不過在預設狀態下第2與第3條工具列是空的,當我們切換成進階模式後,,
** 注意! 作任何程式碼更動前,請務必先備份! **
修改方法:(以下提到「’」的部份,都是鍵盤〔Enter〕鍵左邊的小寫單引號唷,在這邊沒法正常顯示)
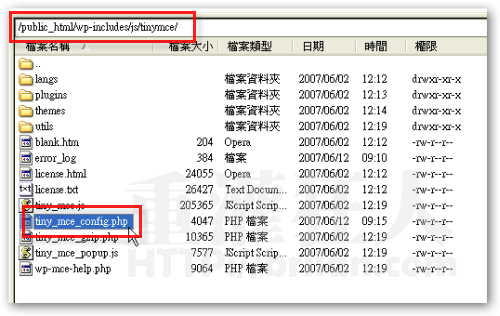
第1步 首先,開啟「/wp-includes/js/tinymce/」資料夾,找到「tiny_mce_config.php」這個檔案,先將他下載到本地電腦中的桌面上。
第2步 接著使用EmEditor或其他你慣用的純文字編輯器開啟「tiny_mce_config.php」這個檔案,並搜尋「$mce_buttons_2 = apply_filters」,大約在第35行左右。
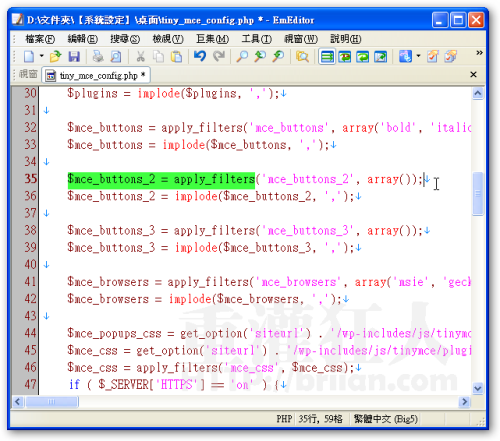
第3步 找到後,將原本「$mce_buttons_2 = apply_filters(‘mce_buttons_2’, array());」中的「array());」改為:
array(‘formatselect’, ‘underline’, ‘justifyfull’, ‘forecolor’, ‘separator’, ‘pastetext’,
‘pasteword’, ‘separator’, ‘removeformat’, ‘cleanup’, ‘separator’, ‘charmap’,
‘separator’, ‘undo’, ‘redo’));
也就是說,在「array()」的括號中加入下面這些按鈕的名稱:
‘formatselect’, ‘underline’, ‘justifyfull’, ‘forecolor’, ‘separator’, ‘pastetext’,
‘pasteword’, ‘separator’, ‘removeformat’, ‘cleanup’, ‘separator’, ‘charmap’,
‘separator’, ‘undo’, ‘redo’
全部加入後,存檔並將檔案上傳到主機中。當然,如果你希望減少哪些按鈕,或調整按鈕前後順序,都可以在上面的程式碼中作調整。
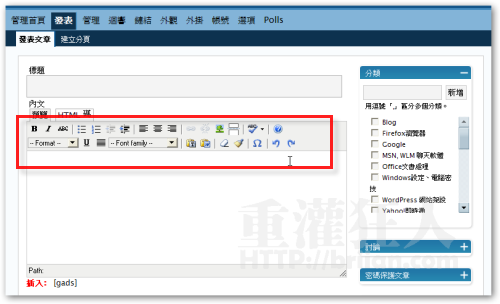
如圖,本來的陽春版編輯器,就會變成像下面一樣的兩組按鈕囉。
另外,你也可以不另外新增一個工具列,直接在原本的第一條工具列後面,直接將你常用的功能按鈕加進去即可。
修改前:
$mce_buttons = apply_filters(‘mce_buttons’, array(‘bold’, ‘italic’,
‘strikethrough’, ‘separator’, ‘bullist’, ‘numlist’, ‘outdent’, ‘indent’,
‘separator’, ‘justifyleft’, ‘justifycenter’, ‘justifyright’, ‘separator’,
‘link’, ‘unlink’, ‘image’, ‘wp_more’, ‘separator’, ‘spellchecker’, ‘separator’,
‘wp_adv_start’, ‘wp_adv’, ‘separator’, ‘formatselect’, ‘underline’, ‘justifyfull’,
‘forecolor’, ‘separator’, ‘pastetext’, ‘pasteword’, ‘separator’, ‘removeformat’,
‘cleanup’, ‘separator’, ‘charmap’, ‘separator’, ‘undo’, ‘redo’, ‘wp_adv_end’));
上面被「’wp_adv’」跟最後面的「’wp_adv_end’」兩個標籤包起來的部份,就是切換成進階編輯器後會出現的功能按鈕,我們只要將需要使用到的按鈕名稱搬到「’wp_adv’」左邊的位置即可,意思就把按鈕放到「不用切換到進階編輯器也會出現的區塊」裡頭去。
修改後:
$mce_buttons = apply_filters(‘mce_buttons’, array(‘formatselect’, ‘bold’,
‘italic’, ‘underline’, ‘strikethrough’, ‘separator’, ‘bullist’, ‘numlist’,
‘outdent’, ‘indent’, ‘separator’, ‘justifyleft’, ‘justifycenter’,
‘justifyright’, ‘separator’, ‘forecolor’, ‘separator’, ‘link’, ‘unlink’,
‘image’, ‘wp_more’, ‘separator’, ‘removeformat’, ‘wp_adv_start’, ‘wp_adv’,
‘separator’, ‘formatselect’, ‘underline’, ‘justifyfull’, ‘forecolor’,
‘separator’, ‘pastetext’, ‘pasteword’, ‘separator’, ‘removeformat’, ‘cleanup’,
‘separator’, ‘charmap’, ‘separator’, ‘undo’, ‘redo’, ‘wp_adv_end’));
改好之後的樣子:
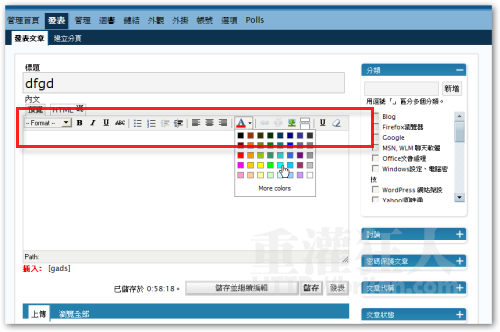
常用的按鈕都放在同一個工具列中,方便多啦 !當然,你可以依照你的使用習慣慢慢調整,注意要先備份原始檔案就是了。
如果你懶得改的話,可以下載我改好的:按這裡
(僅適用WordPress 2.2版本,其他版本我沒測試過是否檔案相同)
[gads]
,
站長~目前WordPress版本可改了嗎
2.5版的要怎麼弄跟這個一樣呢~請問不萊恩大大
這則很棒呢~我趕快來去弄一弄謝謝你的教學^^
太棒了! 原來可以這樣改啊 ^^